E02 First Switches

 Back to the Material: Ethernet, VLANs and Switching
Video: Instructions for E02
Danger: Watch these videos if necessary for more info
This laboratory is step by step instructed, but later when asked to apply the skills given here (at E04)... lot of confusion has happened.
Thus these videos are here to help!
Video: virtual machine adapters, ping & how to draw
Video: Configuring VLAN tagged/untagged
Example Video: E02 step-by-step, Exercise done in teaching by the teacher during spring 2022
I explain long and in detail, thus long video but, you can't go wrong with this one. Hopefully. Same video description has time tags for E01 - E05.
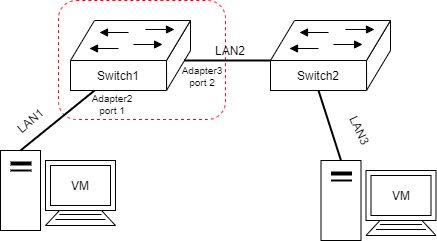
Topology

Importing a Network Switch -virtual machine(s)
Import the switch.ova file to VirtualBox similarly as instructed in the first assignment.
Bug: There is a compatibility problem with switch.ova and AMD Ryzen processors
Success: This has been solved
See more: http://datanetworks.pages.labranet.jamk.fi/faq/#problem-5-amd-ryzen-processors-switchova
Remember in MAC Address Policy to Generate new MAC addresses for all network adapters
Warning: This is when your responsibility as a Network Administrator begins
This is your data network environment/laboratory. If you mess things up in your exercises, you have to clean it. Your mother won't be here to do it.
Check the settings
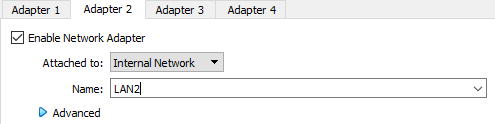
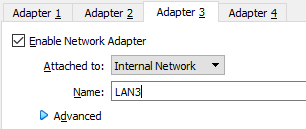
Example: Take the adapters of switch1 and locate them into the correct networks in VirtualBox
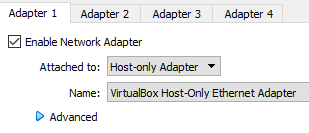
Host-only adapter has to be created in Linux/Apple products
Image of the problem
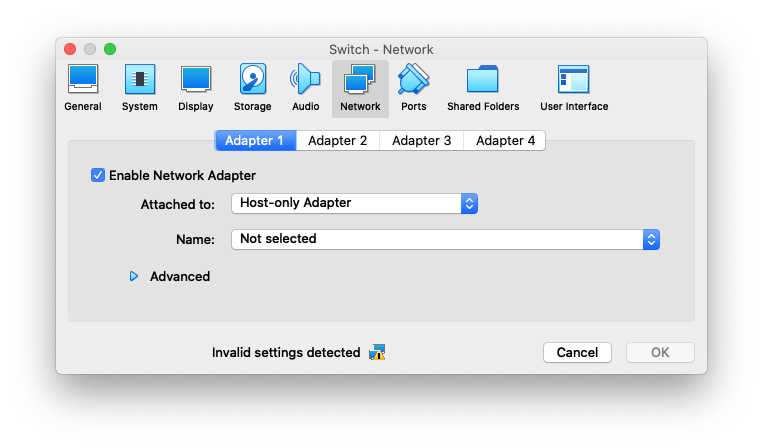
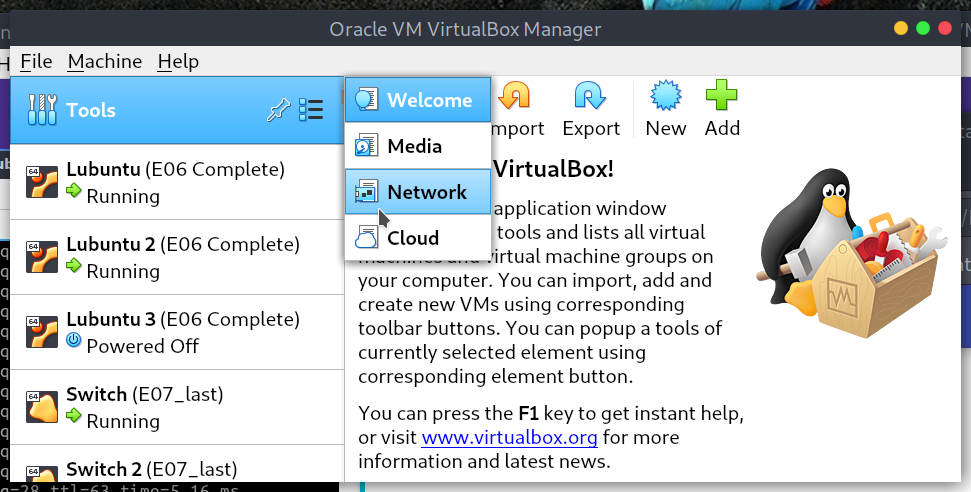
Solution to the problem
Tools -> Network -> Create
Clone the switch!
Lets create the second switch Network_switch 2 by cloning the first one.
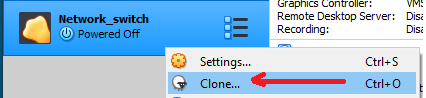
Rename the switch accordingly (e.g. Network_switch 2).

Do a full clone of the switch.
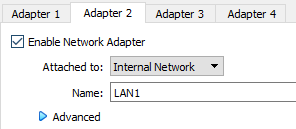
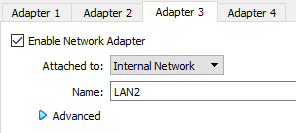
Example: Set the adapters on Network_switch 2 as instructed below.
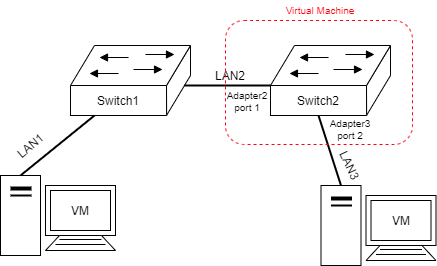
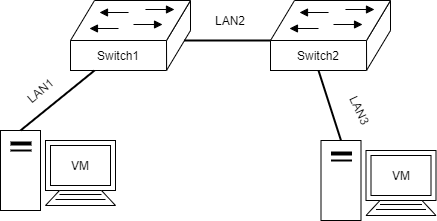
When adapters are set correctly, the topology would look like this.
If you get confused, check this FAQ
Problem 13 - How do the (Network) Adapters in VirtualBox work?
Accessing and using the Network Switch
Tip: Configuring the Switch -video
Start the virtual machine. Let the Network Switch boot up. Once finished you should be at a black screen containing text as follows:
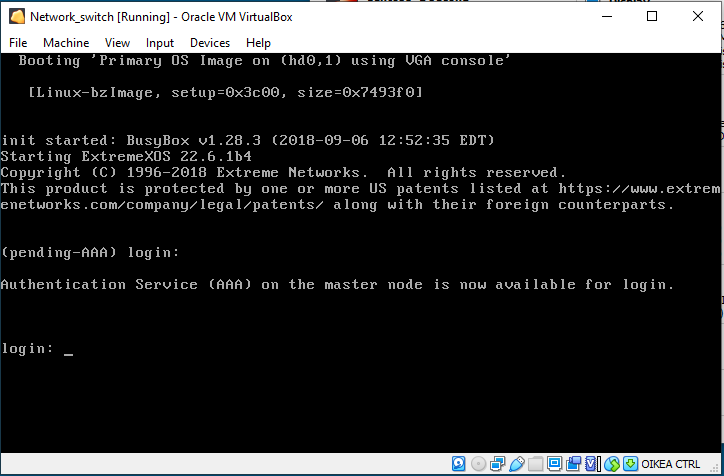
Warning: It takes a little bit of time for the (pending-AAA) login: to stop... be patient
You might have to (left-mouse) click into the console screen and press enter once for the login: _ to appear
Once only login: _ is visible, you can login using the credentials given in the README.txt:
login: admin
password:
Which should bring you to the terminal.
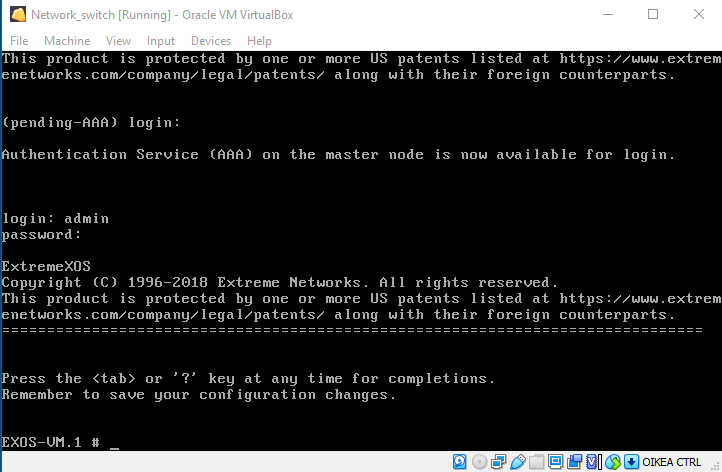
You can look at the configuration by typing in show configuration.
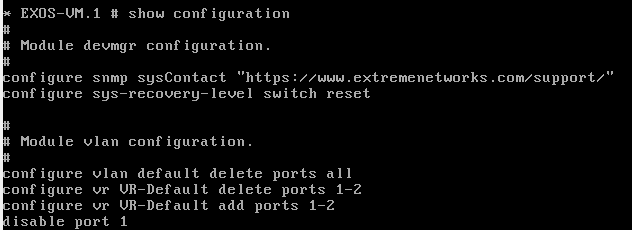
You can hit spacebar to continue or q to stop.
Example: You might want to name the console output of the devices
To not get confused between the switch consoles...
Naming in EXOS (Switches)
EXOS-VM.1# configure snmp sysName [name]
Enabling Ports
The switch starts with ports disabled. We need to start enabling them.
The term port means physical ports of the switch!
Some might get this confused with TCP/UDP port numbers...
If you get confused, check this FAQ
Problem 13 - How do the (Network) Adapters in VirtualBox work?
This can be done by enabling one port at a time.
enable ports 1
enable ports 2
Or by defining a range.
enable ports 1-2
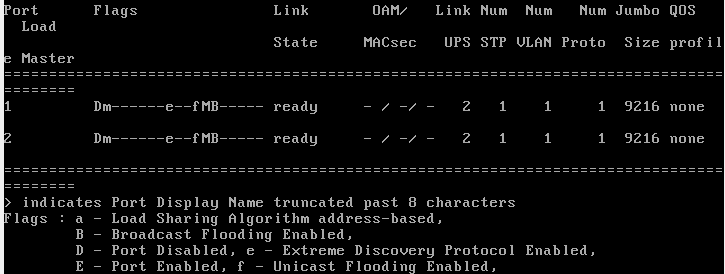
You can verify the state of the port with the command show ports info. The command can be a range e.g. show ports 1-2 info.
Enabled port - Flags: E
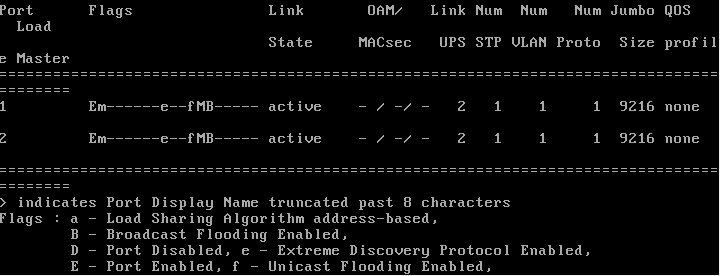
Disabled port - Flags: D
Configuring End Devices manually
Remember to clone the other Lubuntu also according to the topology!
Move the Lubuntus network adapters:
first lubuntu VMtoLAN1andsecond lubuntu VMto LAN3!
Draw a picture of your topology (based on the network adapter settings in VirtualBox).
At this point on the course we do not know about IP addressing or subnets, but we can still manually assign addresses by following the steps below.
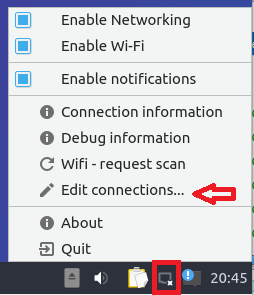
Start up the lubuntu virtual machine and right click the network icon in the bottom right. Left click Edit Connections...
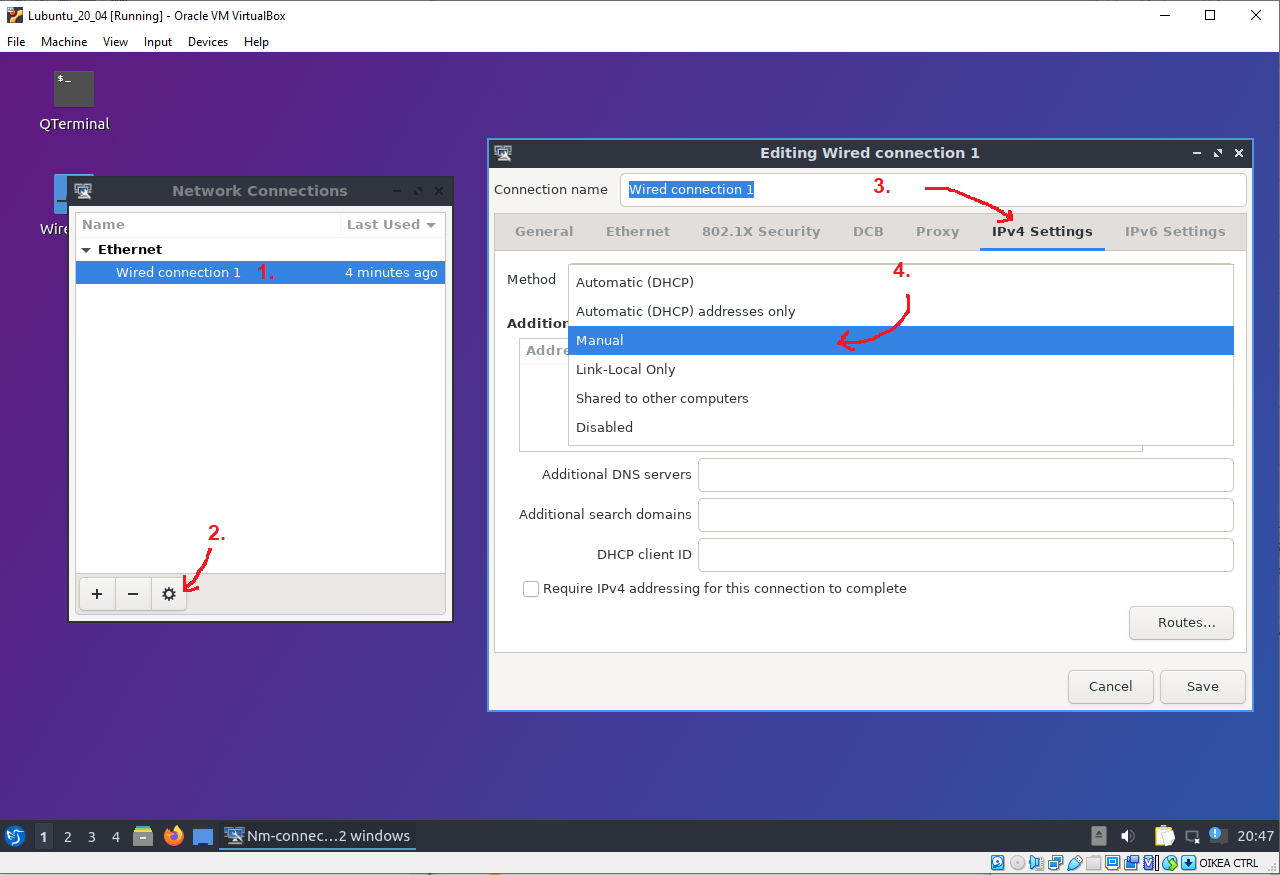
Follow the numbers in the figure below by left clicking each one
Under Editing Wired connection 1 window, press + Add and write down the following addresses into the box.
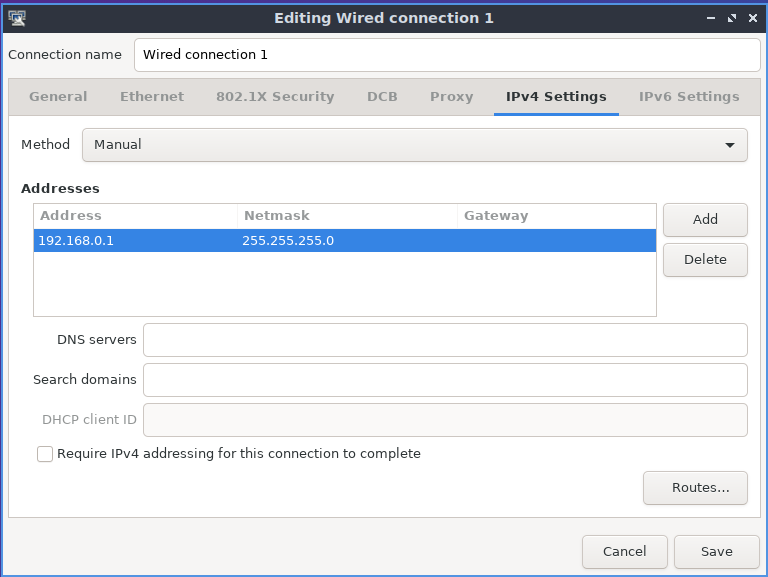
Press Save and close the window.
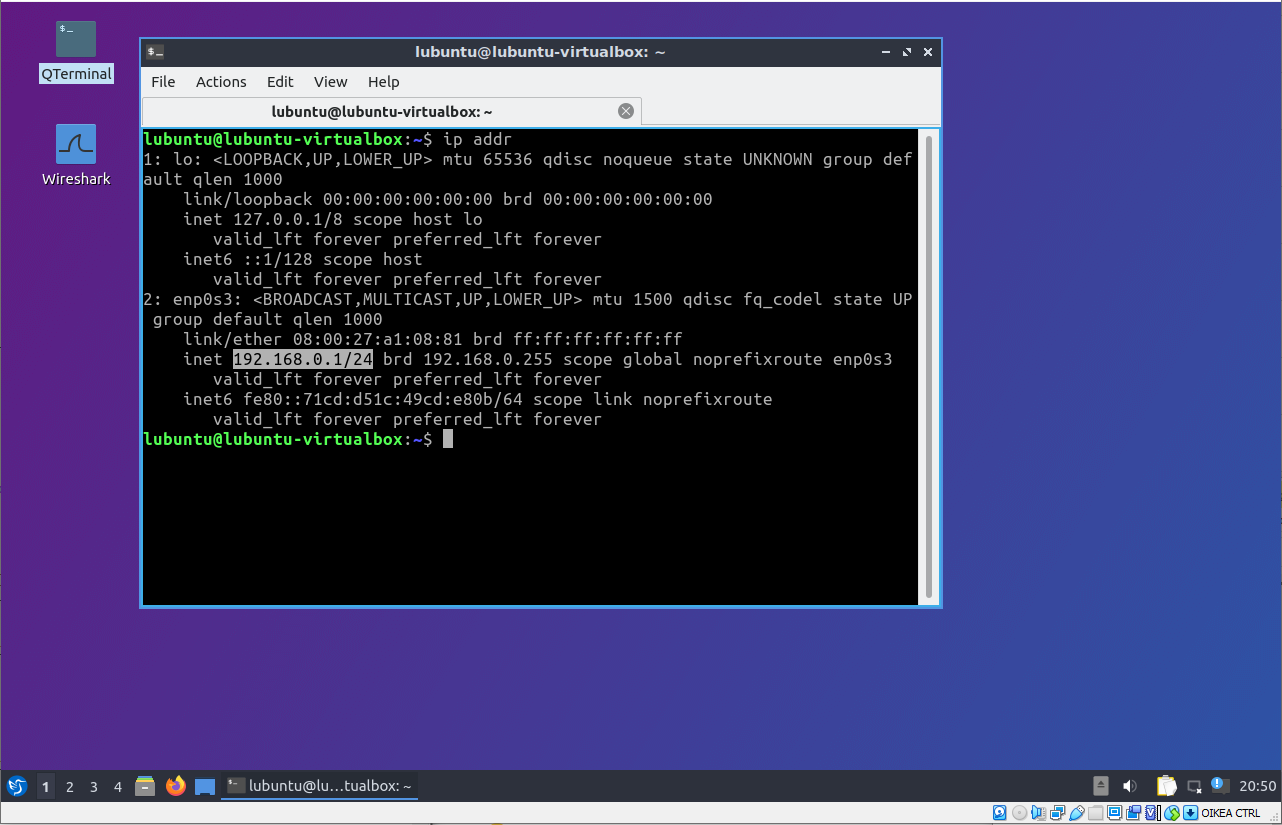
Once done you can double click the QTerminal and verify that the operating system has taken the IP-address into use by writing the command ip addr
Warning: Notice! Save doesn't mean take into use
if the address doesn't come into use, you can press the network logo on the bottom right (in Lubuntu) to force the interface up/down
Do the same for Lubuntu2, but use an IP address of 192.168.0.2
Testing connectivity
Once the End Devices have been addressed, verify the connection by using ping tool. Depending on which virtual machine terminal you are on... ping the opposing machine's IP address. Lubuntu1 should ping 192.168.0.2 and Lubuntu2 should ping 192.168.0.1.
Successful ping should look like this
lubuntu@lubuntu-VirtualBox:~$ ping 192.168.0.2
PING 192.168.0.2 (192.168.0.2) 56(84) bytes of data.
64 bytes from 192.168.0.2: icmp_seq=1 ttl=64 time=1.05 ms
64 bytes from 192.168.0.2: icmp_seq=2 ttl=64 time=2.14 ms
64 bytes from 192.168.0.2: icmp_seq=3 ttl=64 time=2.10 ms
64 bytes from 192.168.0.2: icmp_seq=4 ttl=64 time=2.22 ms
^C
--- 192.168.0.2 ping statistics ---
4 packets transmitted, 4 received, 0% packet loss, time 3003ms
rtt min/avg/max/mdev = 1.051/1.878/2.221/0.482 ms
lubuntu@lubuntu-VirtualBox:~$
You can stop pinging by selecting the terminal and pressing CTRL+C.
Investigating Forwarding Tables
Leave the pings on so that there is active traffic in the network.
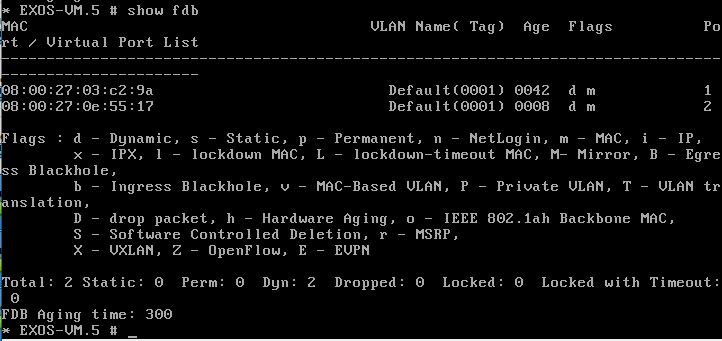
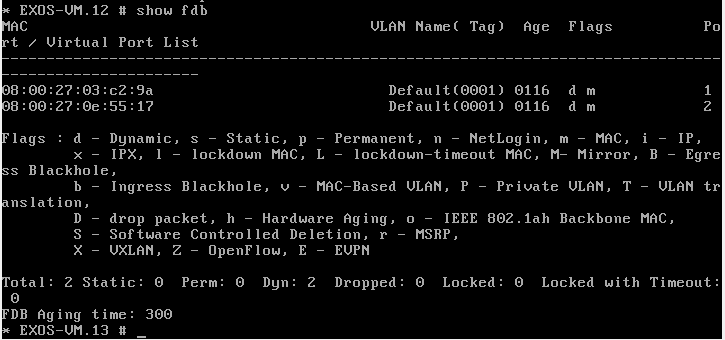
Lets look at the forwarding tables of the switches with the command show fdb.
show fdb command on switch1
show fdb command on switch2
Adding VLANs
Creating the VLAN
Lets create our first VLAN with the command create vlan workstations
The VLAN needs an Ethernet 802.1Q tag, which can be declared with the command configure vlan workstations tag 5
The switch now has the VLAN declared, but not in use.
Assigning untagged ports to a vlan
By default, all of the ports on the switch are currently in VLAN default and as untagged. Thus we need to remove it before adding workstations vlan to the ports.
You can do this with the command:
configure vlan default delete ports all.
The port towards the Lubuntu virtual machine should be untagged in VLAN workstations.
configure vlan workstations add ports 1 untagged
Creating tagged Ports
The port towards the other switch should be tagged
configure vlan workstations add ports 2 tagged
Do the same for the other switch, but be vary of the port assignments!
If necessary, look at your topology and Problem 13 - How do the (Network) Adapters in VirtualBox work?
Testing connectivity
If you left the ping on while doing changes in the network configuration, the ping should have stopped when you were doing the network configuration changes
64 bytes from 192.168.0.2: icmp_seq=462 ttl=64 time=2.19 ms
64 bytes from 192.168.0.2: icmp_seq=463 ttl=64 time=2.06 ms
From 192.168.0.2 icmp_seq=495 Destination Host Unreachable
From 192.168.0.2 icmp_seq=496 Destination Host Unreachable
...
...
From 192.168.0.2 icmp_seq=538 Destination Host Unreachable
From 192.168.0.2 icmp_seq=539 Destination Host Unreachable
64 bytes from 192.168.0.2: icmp_seq=540 ttl=64 time=2003 ms
64 bytes from 192.168.0.2: icmp_seq=541 ttl=64 time=1003 ms
64 bytes from 192.168.0.2: icmp_seq=542 ttl=64 time=3.59 ms
64 bytes from 192.168.0.2: icmp_seq=543 ttl=64 time=2.33 ms
Danger: If ping doesn't work, try to solve the problem yourself
There is a small detail, which requires thought while following/copying the instructions.
Think.
Ask for assistance, if necessary.
Saving configuration
Switches forget their configuration unless it is saved!
You can save the configuration with save command. The switch will prompt you for confirmation.
EXOS-VM.1 # save
The configuration file primary.cfg already exists.
Do you want to save configuration to primary.cfg and overwrite it? (y/N) Yes

Saving configuration primary.cfg  on master .. done!
Configuration saved to primary.cfg successfully.
EXOS-VM.2 #
This will ensure that the configuration is written onto the hard disk of the switch. The virtual machine switch will remember the configuration even after restarting/booting the virtual machine.
Wiresharking an Ethernet Frame
Create a third Lubuntu Wireshark virtual machine.
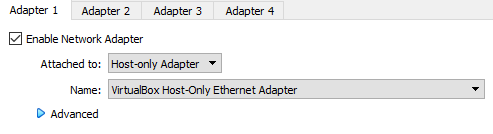
Change the adapter settings of the virtual machine.
Settings->Network->Adapter 1- goto advanced
- Change
Promiscuous ModetoAllow All!!! - Verify that
Attach toisInternal Network - Select the network name according to the cable/network you want to investigate (e.g.
LAN2)
Now the Lubuntu Wireshark can investigate all network traffic seen on the selected cable/network.
Capturing Traffic
Boot up the Lubuntu Wireshark virtual machine. Start wireshark from the desktop. Start the recording on wireshark by selecting eth0.
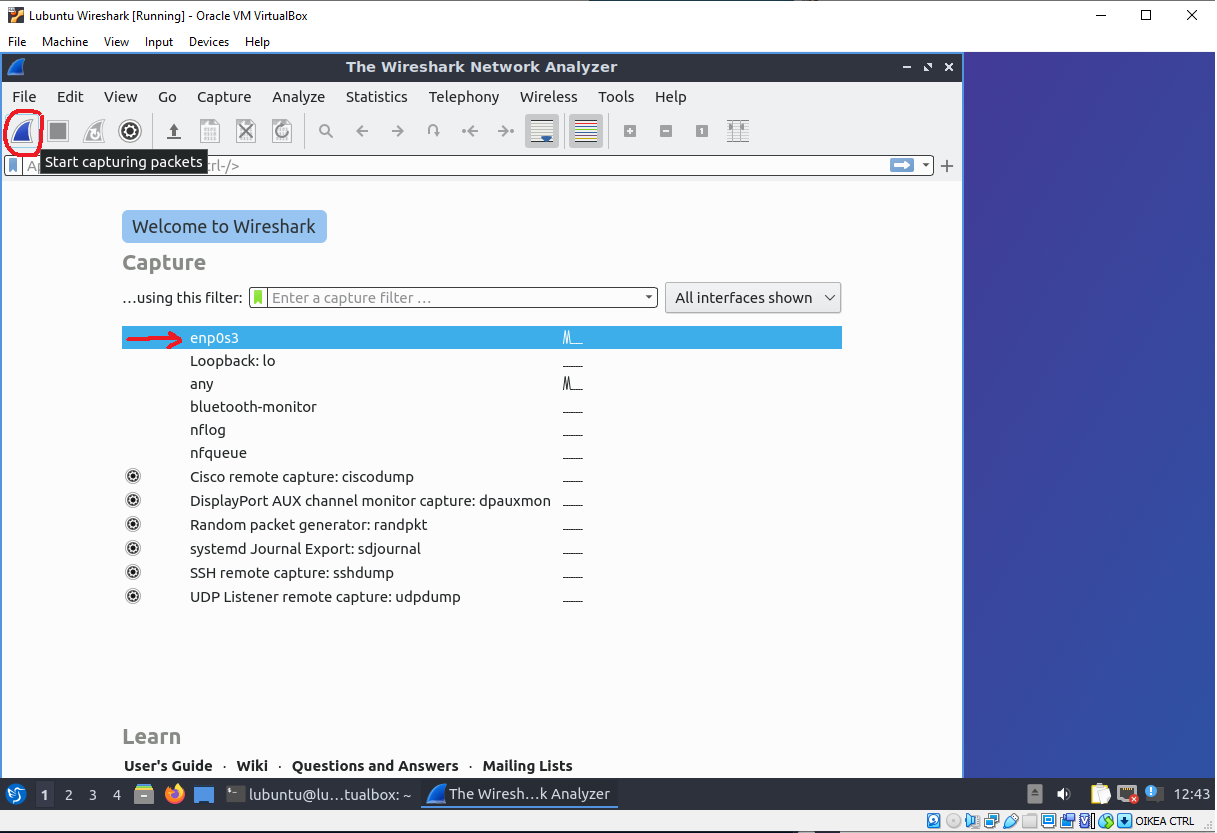
Traffic should start to tricle down the interface row by row.
You can stop the recording by pressing the red square in the control ribbon of Wireshark.
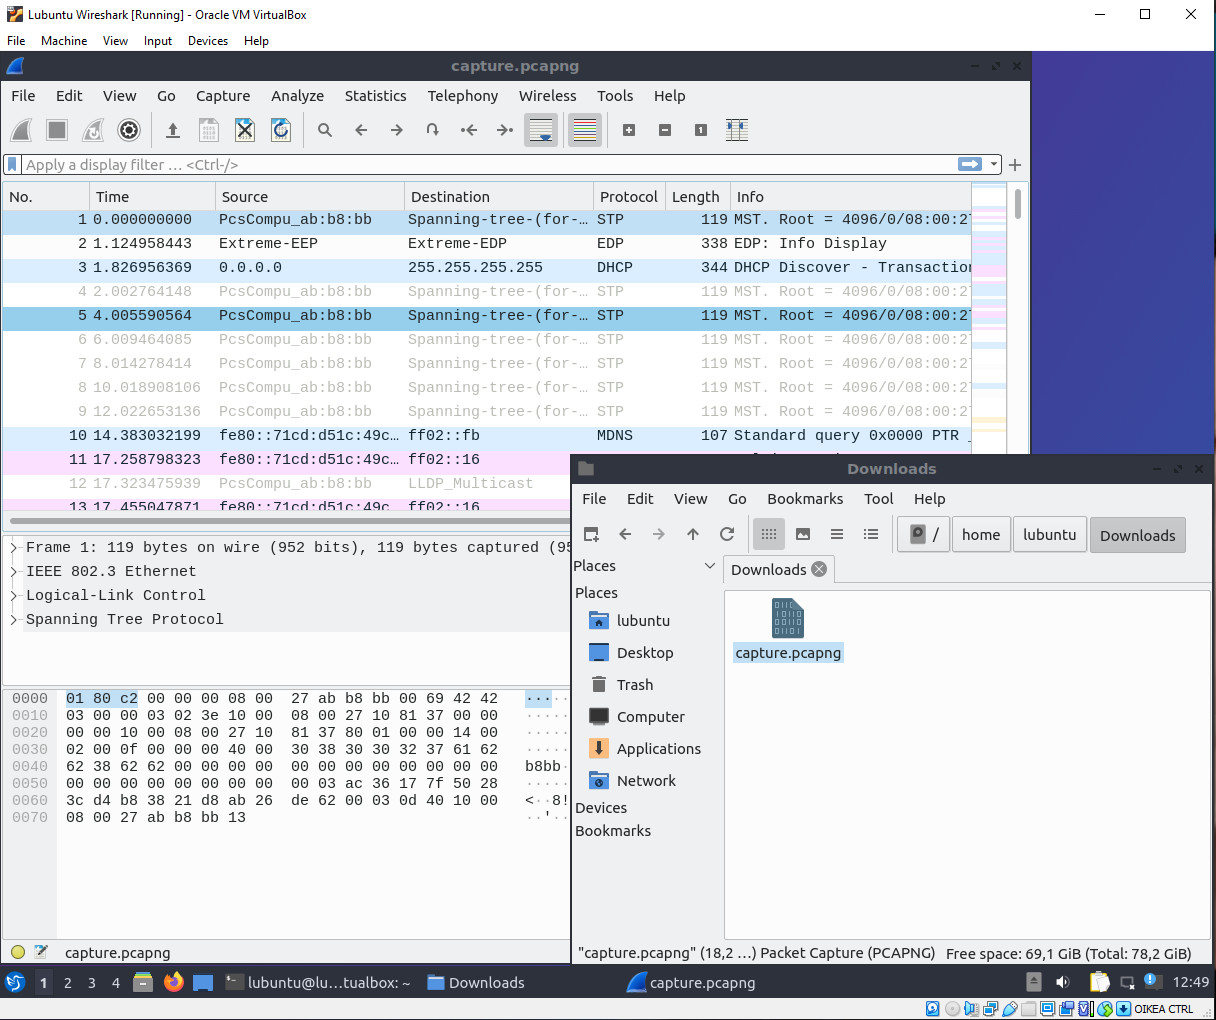
Saving the Recording
Select File -> Save As... -> Locate a correct folder -> Name the file -> Press Save
Now the Network traffic capture is a file on the disk of the virtual machine. And can be investigated thoroughly.
Warning: Leaving the recording on starts to deplete the resources of the virtual machine!
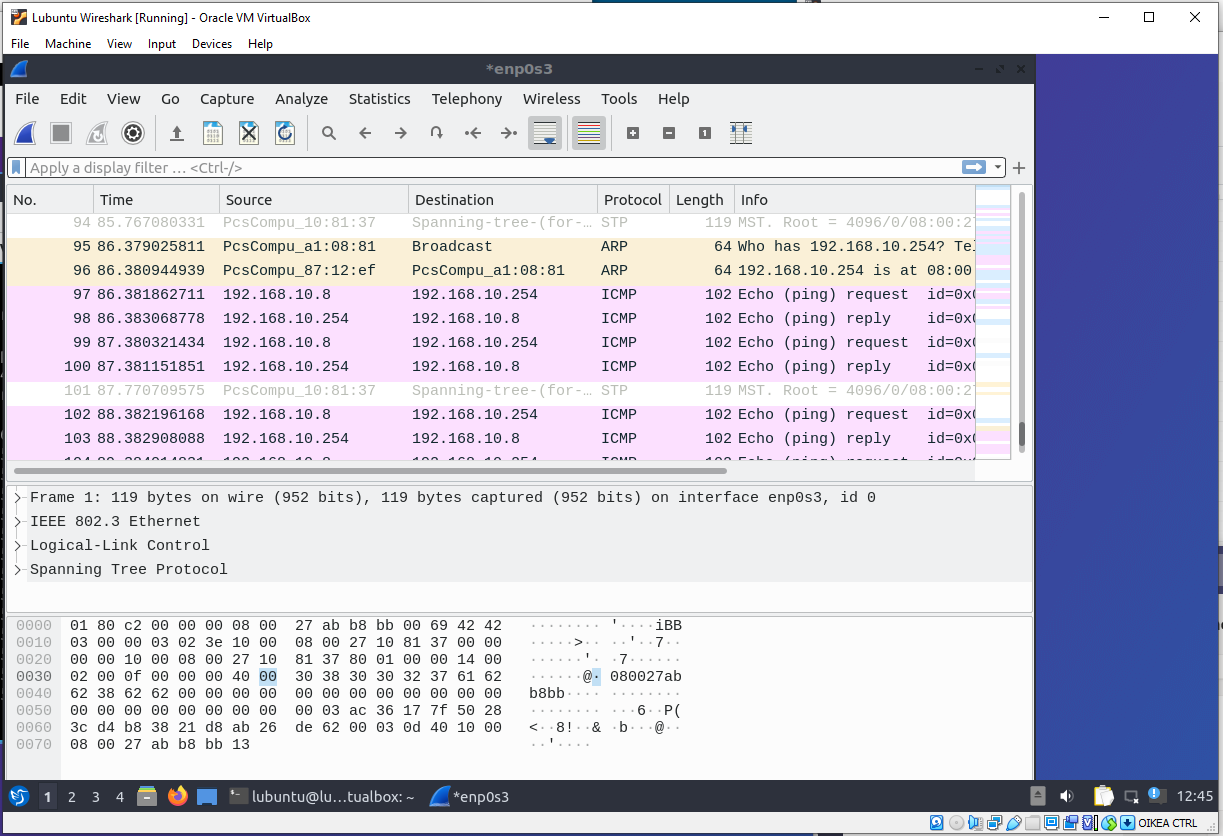
Going through the fields
Choose one row. Check the following fields and record them into your exercise document as figures.
- Find the source MAC address
- What is the Ethertype
- Find the source IP address
- What is the Payload of the Ethernet frame in the selected capture row?
Recording configuration from the switches
Do this individually to both switches.
Address the first switch (switch1) with the command
conf vlan workstations ipaddress 192.168.0.253/24
This isn't best practice, but will suffice at the start of our studies
As there are no strong passwords set .... the network devices are vulnerable to brute force attacks.
Address the second switch (switch2) with the command
conf vlan workstations ipaddress 192.168.0.252/24
Enable SSH -server on both of the switches by with the command below
EXOS-VM.8 # enable ssh2 port 22
WARNING: Generating new server host key
This could take up to 1 minute and cannot be cancelled. Continue? (y/N) Yes

Key Generated.
EXOS-VM.9 #
Go to a Lubuntu Machine
Ensure you have the clipboard of your computer enabled correctly in VirtualBox
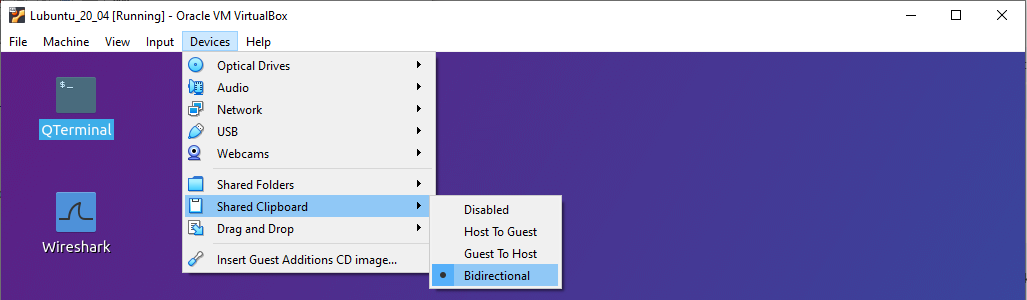
SSH from the Lubuntu Qterminal to the switch. The prompt first asks if you want to trust the newly created SSH keys. Answer yes. Then the prompt asks for an password. Note that the admin's password is the same as in the switch virtual machine console.
lubuntu@lubuntu-virtualbox:~$ ssh admin@192.168.0.252The authenticity of host '192.168.0.252 (192.168.0.252)' can't be established.
RSA key fingerprint is SHA256:D/HVddWrAq+EPG+ytADya/kM9e7lioVWasK2ENvCTCk.
Are you sure you want to continue connecting (yes/no/[fingerprint])? yes
Warning: Permanently added '192.168.0.252' (RSA) to the list of known hosts.
admin@192.168.0.252's password:
ExtremeXOS
Copyright (C) 1996-2020 Extreme Networks. All rights reserved.
This product is protected by one or more US patents listed at https://www.extremenetworks.com/company/legal/patents/ along with their foreign counterparts.
==============================================================================


Press the <tab> or '?' key at any time for completions.
Remember to save your configuration changes.

* EXOS-VM.1 # show configuration
...
This will print out the configuration of your switch (if you press spacebar enough). Copy it into your documentation E02.md (from both devices).
This video is spoken in Finnish. ENABLE THE ENGLISH SUBTITLES
Example video of the saving process
What to document of the exercise?
Document in the repository E02.md & /documentation/E02/ -folder:
- Screenshots, analysis & text while doing
- Proof of working connectivity tests
show fdb-command- Wireshark inspections
- Configuration of all the network devices
- Your topology drawings (physical, logical, etc)
Back to the Schedule?
License
This course and its materials are written by Karo Saharinen and licenced by Attribution-NonCommercial-NoDerivatives 4.0 International (CC BY-NC-ND 4.0) license.
